To prepare your home for window installation day, clear at least 3 to 5 feet of space around every window being replaced, remove all window treatments and wall decor in those rooms, disable any window alarms, and secure pets and children away from the work area. Doing these things before your crew arrives prevents delays, protects your belongings, and helps your installer work faster and more accurately. This guide covers every step you need to take inside and outside your home, what to expect on the day itself, how long the process takes, and how to tell when a window has been installed correctly.
How to Prepare Your Home for Window Installation Day
Preparing your home for window installation day means completing a short checklist of tasks 3 to 5 days before the scheduled date. Starting early gives you time to move furniture carefully, arrange for pets, coordinate with your installer on any access questions, and avoid a rushed morning scramble.
According to research from Andersen Windows, blinds and curtains alone can take hours to remove if left until the last minute, and window alarms that have not been disconnected are one of the most common causes of installation delays on the day of the job. A little planning goes a long way. Skilled professional window installers can replace 30 to 60 minutes per standard window, according to data from Angi, meaning most whole-home replacement jobs in Newberg and the Portland area are completed in a single day. The last thing you want is for prep work to eat into that time.
The steps below cover everything. Follow them in order and your installation day will run as smoothly as possible.
What Is the First Step in Preparing Your Home for Window Installation?
The first step in preparing your home for window installation is to call your installer 2 to 3 days before the scheduled date and confirm the key details of the project. Ask whether the crew will be working from the inside, the outside, or both, since this changes how you need to prepare each room and the exterior of the home. Also confirm the arrival time, how many crew members to expect, and where they plan to stage their tools and materials.
This conversation also gives you the chance to ask about any specific concerns for your home. Older homes in the Portland metro and Newberg area sometimes have window frames that are out of square or have experienced moisture damage from Oregon’s rainy winters. Knowing this in advance helps your crew plan for any extra work that may be needed without it coming as a surprise on installation day.
Once you have confirmed the details, walk through every room where windows are being replaced and make a mental list of everything that needs to be moved, removed, or covered. This walkthrough makes the actual prep work go much faster.
How Do I Prepare the Inside of My Home for Window Replacement?
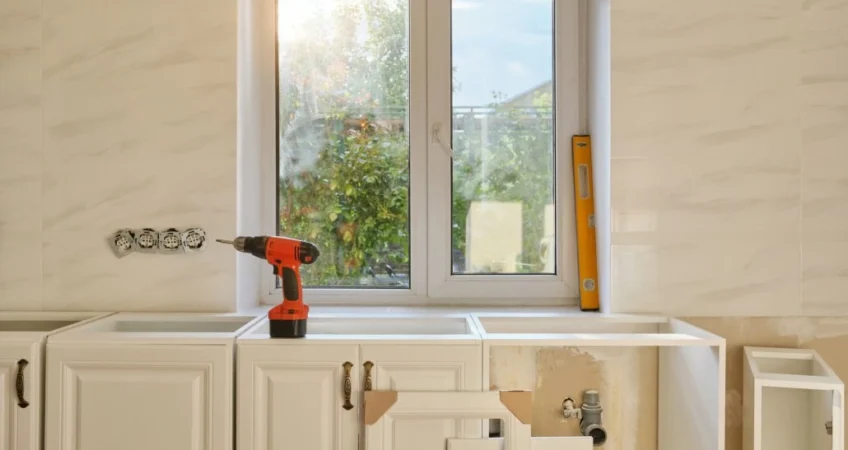
To prepare the inside of your home for window replacement, remove all window treatments, clear a 3 to 5-foot path around each window, cover nearby furniture with drop cloths, take down wall decor in those rooms, and relocate any electronics or valuables near the work areas.
Remove All Window Treatments Before the Crew Arrives
Remove all curtains, blinds, shades, valances, shutters, and curtain rods from every window being replaced before the installation crew arrives. Leaving these in place slows the crew down and risks damage to the treatments. Store them in another room where they will not be in the way and will not get dusty or scuffed by the work.
If your window treatments are attached to the wall above the window frame, remove the mounting hardware as well. Installers may need access to the wall directly above and around the window opening during the removal and installation process.
Clear at Least 3 to 5 Feet of Space Around Every Window
Clear at least 3 to 5 feet of space around every window being replaced, on all sides. This means moving sofas, chairs, tables, lamps, bookshelves, and any other furniture that sits within that radius. The crew needs this space to place drop cloths, set tools, remove the old window, and maneuver the new unit into place.
For very large windows or bay windows, you may need to clear even more space. Ask your installer during your pre-installation call if there are any windows in your home that will require extra room to work around.
Furniture that cannot be moved, such as a large built-in bookshelf or a piano, should be covered with a drop cloth or old sheets. Even the best crews generate dust and small debris during window removal. Covering stationary items is easier than cleaning them afterward.
Remove Wall Decor and Relocate Electronics
Remove all picture frames, artwork, mirrors, and decorative items from the walls in rooms where windows are being replaced. When the old window frames are removed, there can be vibration in the surrounding wall. Items hanging nearby may shift or fall. Take them down and store them safely in a different room.
Computers, televisions, and other electronics near the work zone should also be relocated or at minimum covered. When old windows come out, there is a brief period before the new window is set during which the opening is exposed to the outside air. Wind can stir up dust and carry debris. Protecting electronics is a simple step that prevents an expensive headache.
Homeowners in Newberg who enjoy doing some of their own home maintenance can find helpful guidance on what to handle yourself and when to bring in a professional on the homeowner and DIY resources page.
Disable Window Alarms and Security Sensors
Disable all window alarms and security sensors on every window being replaced before the crew arrives. Most window installers are not authorized or trained to work around active security systems. If a sensor is attached to the window frame, it must be removed before the old window is taken out.
Contact your security company at least a day before installation day to let them know windows will be replaced. In many cases, the security company can advise you on how to temporarily disarm the sensors or send a technician to handle the disconnection and reconnection. Do not leave this until the morning of installation.
How Do I Prepare the Outside of My Home for Window Installation?
To prepare the outside of your home for window installation, trim back any shrubs, bushes, or tree branches that overhang or grow close to the windows being replaced, move all patio furniture, planters, garden hoses, grills, and outdoor equipment away from those areas, and clear enough space near the driveway for the installation crew to park their vehicles close to the home.
Delicate plants that sit directly below a window being replaced should be temporarily moved to another part of the yard if possible. Installers work carefully around landscaping, but their priority is always the safe removal and installation of the window itself. If a small plant is in a high-traffic spot right below the work area, moving it protects it from being accidentally damaged.
For homeowners in the Portland metro and Willamette Valley area, check the weather forecast for your installation day. Oregon’s rainy season can create wet or muddy conditions around the home’s exterior. Laying down boards or old mats along the path the crew will walk helps protect both your lawn and the installer’s footing.
Do They Have to Come Inside Your House to Replace Windows?
Yes, in most cases, the installation crew does need to come inside your house to replace windows. Most replacement windows are installed from both the inside and the outside, with one person working inside and another working from outside at the same time. The interior work involves applying insulation foam, attaching interior trim, completing the caulk seal on the inside of the frame, and cleaning up afterward.
For some types of insert replacements, where the new window slides into the existing frame without removing the frame itself, more of the work can be done from the outside. Your installer will confirm the approach based on your specific window type and home layout during the pre-installation walkthrough.
Plan for crew members to move freely between rooms and the exterior throughout the day. Keep interior pathways clear, and make sure gates, side yards, and exterior access points are unlocked before they arrive. If you have a gated driveway or a code-protected entry, share the access information with your installer ahead of time.
For projects that involve new construction or major multi-window replacements, coordinating a smooth access plan with your installer ahead of time makes a real difference. Builders and contractors in the Newberg and Portland areas can explore full-service options through the contractor and builder services available locally.
How Long Does a Professional Take to Install a Window?
A professional window installer takes approximately 30 to 60 minutes per window, according to data from Angi and multiple industry sources. That means a skilled crew can install 10 to 15 windows in a single day under typical conditions, which makes most whole-home replacement projects in the Newberg and Portland area a one-day job.
Several factors can extend installation time beyond that range. Second-story windows require more setup and safety measures. Windows with damaged frames or wood rot that is discovered during removal require repairs before the new unit can be set. Very large custom windows take longer to handle because of their size and weight. In homes that are not perfectly level or square, the installer must spend extra time shimming and aligning the frame before fastening.
Oregon’s rainy winters also occasionally create complications. If your home has older windows that were not sealed well, the crew may discover moisture damage in the surrounding wall cavity after removing the old unit. A good installer will address this before proceeding to protect your home from further water intrusion.
From the time you sign a contract to the time your new windows are installed, the full timeline is typically 3 to 6 weeks according to industry data. This accounts for the manufacturer’s production and shipping lead time, which is usually 2 to 4 weeks for standard windows. The installation day itself is fast. The wait for the windows to be ready is where most of the time goes.
| Task | When to Do It | Why It Matters |
|---|---|---|
| Confirm details with installer | 2 to 3 days before | Clarifies inside/outside access, timing, and crew size |
| Remove window treatments | Day before or morning of | Prevents delays and protects blinds and curtains from dust |
| Clear 3 to 5 feet around windows | Day before | Gives crew room to work and reduces accidental damage |
| Disable window alarms | 1 to 2 days before | Crew cannot remove window frames with active sensors in place |
| Remove wall decor and cover furniture | Day before | Protects items from vibration and dust during removal |
| Trim exterior landscaping | 2 to 3 days before | Ensures unobstructed exterior access to all window openings |
| Secure pets and make child care plans | Day before | Keeps pets and kids safe away from open frames and tools |
| Clear driveway and exterior paths | Morning of installation | Allows crew vehicles to park close and reduces setup time |
Sources: Andersen Windows installation guidance, Angi window replacement data, Window World installation guidelines, Standard Companies preparation guide
What Should You Do With Pets and Children on Installation Day?
Pets and children should be kept safely away from all active work areas throughout the entire installation day. Window installation involves open window frames, sharp tools, heavy glass units, and frequent movement of crew members in and out of the home. These conditions create real safety hazards for both curious children and pets.
For pets, the safest option is to arrange for them to stay with a friend, family member, or a boarding facility for the day. If that is not possible, keep pets in a room that is as far from the work areas as possible, with the door closed. Let your installer know where pets are secured so they can make sure doors to that room are not accidentally opened during the project.
For children, try to schedule installation on a school day if possible. If children will be home, designate a safe play area away from all work zones and make sure they know to stay clear. Young children should be supervised by an adult throughout the day and not allowed to approach open window frames or areas where the crew is working.
What Are Common Window Installation Mistakes to Watch For?
Common window installation mistakes include improper caulking, poor insulation around the frame, windows that are not level or square, and missing or clogged weep holes. These mistakes can cause drafts, water intrusion, condensation between the panes, and higher energy bills even in a newly installed window.
According to research from custom window installation experts, DIY or inexperienced installers often miss critical steps like proper exterior wrapping, correct caulking technique, and interior trim alignment. Even small errors in any of these areas can quietly undermine the performance of an otherwise good window for years.
The most common caulking mistake is applying caulk in the wrong places. Never caulk over weep holes at the bottom of the window frame. Weep holes allow moisture that gets behind the frame to drain out. Sealing them traps water inside and can lead to rot and mold over time. According to Mr. Handyman, this is one of the most damaging caulking mistakes a homeowner or inexperienced installer can make.
Proper installation also means the window must be square. A window that is even slightly out of square will not seal properly, will be harder to open and close over time, and may develop operational problems as the frame settles. A quality installer uses a carpenter’s level and checks diagonal measurements across the frame to confirm it is perfectly square before fastening.
Many families across Tigard and Beaverton have avoided these issues by choosing a company with a long track record of professional installation. Reviewing product options and certified installation processes available through replacement windows in Tigard is a good place to start if you are comparing installers in the area.
How Do You Tell If a Window Is Installed Correctly?
You can tell a window is installed correctly by checking five things after the crew finishes: the window operates smoothly, the frame is level and square, there are no drafts around the edges, the caulk lines are clean and continuous, and there is no fogging or condensation between the panes.
Start by opening and closing the window. It should slide, swing, or tilt smoothly without sticking, binding, or requiring excessive force. A window that is hard to operate right after installation is a sign that the frame may not be square or may have been fastened too tightly.
Run your hand slowly around the interior edges of the frame on a cool day or a windy day. A properly installed window has no draft. Any feeling of moving air around the trim or sash means the insulation or caulk seal is incomplete.
Look at the caulk lines on both the interior and exterior. They should be smooth, even, and continuous with no gaps, cracks, or missing sections. According to research from AWP Windows, corners are particularly vulnerable to water entry, so pay extra attention to how the caulk was applied at all four corners of the exterior frame.
Check that the weep holes at the bottom of the frame are clear and not blocked by caulk or debris. These small drainage holes are a critical part of the water management system of any replacement window.
Finally, look at the glass itself. There should be no fogging, streaks, or condensation inside the sealed glass unit. Condensation between the panes means the seal between the two glass layers has failed, which eliminates the insulating gas fill and significantly reduces the window’s energy performance.
Homeowners in Salem and the surrounding Willamette Valley communities who want to confirm their windows are performing as expected can work with a trusted local dealer. Replacement windows in Salem from a certified installer come with professional guidance on how to inspect the finished work and what your warranty covers.
What Are Common Window Sealing Mistakes?
Common window sealing mistakes are applying caulk over weep holes, caulking moving parts like sashes or operable hardware, using the wrong type of caulk for the surface material, skipping surface preparation, and applying caulk in freezing temperatures when it will not cure properly.
Using the wrong caulk is one of the most common problems. Vinyl window frames require a caulk formulated for plastic surfaces. Exterior caulk must be weather-resistant and UV-stable to hold up through Oregon’s wet winters and warm summers. According to product experts cited by Bob Vila, 100% silicone caulk or a high-quality silicone-latex blend is the best choice for exterior window applications because it is waterproof, flexible, and lasts 20 or more years. Less expensive butyl rubber or oil-based caulks are far less durable and crack much sooner.
Skipping surface preparation before applying caulk is another major error. Caulk applied over dirt, old caulk residue, or damp surfaces will not bond properly and will fail much sooner than expected. The surface must be clean, dry, and free of any old sealant before fresh caulk is applied.
Another mistake is using caulk alone to fill gaps that are wider than a quarter inch. Large gaps require a foam backer rod to fill the void first, followed by caulk over the top. Without the backer rod, the caulk sags into the gap, cures unevenly, and fails much faster under expansion and contraction.
Where Not to Caulk a Window
Do not caulk window weep holes, the underside of the exterior sill, or any movable parts of the window including the sash, operable hardware, or moving frames. These areas must remain open or able to move freely. Caulking them causes water to become trapped behind the frame or prevents the window from operating correctly.
The top of a window frame, where it meets the exterior wall or trim above, also generally does not need caulk on windows where a drip edge is in place. The drip edge redirects water away from the joint. Adding caulk in this area can actually trap water if it ever gets behind the flashing.
On the interior, do not caulk across the bottom of the window sill in a way that would seal the weep holes from the inside. Interior caulk should seal the gap between the window frame and the interior wall surface, not seal the bottom drainage path of the frame itself.
Builders and contractors coordinating large replacement projects across multiple properties in the Newberg and Portland area can get detailed specification guidance from the team at new construction services to make sure every window in a project is sealed and finished to the right standard.
Is It Worth Replacing 20-Year-Old Windows?
Yes, it is worth replacing 20-year-old windows in most cases. Windows that are 20 years old were manufactured before many of the significant advances in Low-E glass technology, gas fills, and frame materials that define today’s energy-efficient products. The performance gap between a 20-year-old double-pane window and a modern ENERGY STAR certified replacement window can be substantial.
According to the U.S. Department of Energy, replacing old single-pane windows with ENERGY STAR certified models saves between $126 and $465 per year on energy bills. Even homeowners replacing older double-pane windows from the early 2000s often see meaningful reductions in heating costs because modern Low-E coatings and warm-edge spacers are significantly more effective than what was standard two decades ago.
For homeowners in the Portland metro and Willamette Valley, rising energy costs add to the case. Oregon electricity rates increased 30% between January 2020 and January 2024 according to the Oregon Department of Energy. Every dollar you save on heating and cooling is worth more than it was four years ago.
Beyond energy savings, windows that are 20 or more years old may be showing signs of seal failure, wood rot in the frame, difficulty operating, or condensation between the panes. Any of these problems means the window is no longer performing as designed. Replacing it eliminates the problem and adds a product with a fresh warranty.
Homeowners across Beaverton who are evaluating whether the time is right for new windows can see product options and get a free estimate through replacement windows in Beaverton from an experienced local dealer.
What Is the Cheapest Time of Year to Buy Windows?
The cheapest time of year to buy windows is typically late fall and early winter, between November and February, when demand for new window installations is at its lowest. Manufacturers and dealers often run promotions during this slow season to keep installation crews busy and move inventory.
In the Newberg, Portland, and Willamette Valley market, this seasonal pattern holds true. Oregon winters are rainy but rarely extreme enough to prevent window installation from happening safely. A quality installation crew handles all-season installs routinely, and the new window unit is never left unsecured overnight even if a project extends across multiple days.
That said, the best time to replace windows is when your current windows are failing, regardless of the season. A window with a broken seal, water intrusion, or significant air leakage is costing you money on every energy bill. Waiting months for a perceived seasonal discount may cost more in energy waste than you save on the purchase.
Many homeowners in Portland and the surrounding area take advantage of current specials and promotions offered throughout the year. Checking the current specials page is a fast way to see what offers are available right now without waiting for a specific season.
Frequently Asked Questions About Window Installation in Newberg and the Portland Area
Do You Have to Be Home During Window Installation?
Yes, it is recommended that an adult be home during window installation, at least for the initial walkthrough at the start of the day and the final inspection at the end. The crew leader will review the project plan with you when they arrive and ask you to confirm the completed work before they leave. You do not need to watch every step of the process, but having someone present allows the team to ask questions quickly and address any unexpected findings without delay.
How Many Windows Can a Crew Install in One Day in Newberg?
A professional crew can typically install 10 to 15 standard windows in a single day in Newberg and the Portland metro area, according to data from Angi and multiple installation industry sources. For most single-family homes, this means the full project is completed in one day. Larger homes, second-story windows, or homes with damaged frames that require repair work may extend the project to two days. Your installer will give you an accurate timeline estimate during the consultation.
Will Window Installation Damage My Walls or Interior Trim?
No, professional window installation should not damage your walls or interior trim. A good installation crew uses drop cloths, careful removal techniques, and proper tools to remove the old window without disturbing the surrounding wall. However, in some cases, removing an old window reveals existing damage like wood rot, moisture intrusion, or prior water stains inside the wall cavity. When this happens, a professional installer will inform you and recommend the appropriate repair before the new window is set. This is not caused by the installation itself, but it is a good reason to address it before it gets worse.
Do You Caulk the Bottom of a Window When Installing?
No, you do not caulk the bottom exterior sill of a window during installation if the window has weep holes. Weep holes are small drainage openings at the bottom of the window frame that allow moisture to exit the frame rather than building up inside. Caulking over these holes traps water and can cause rot, mold, and structural damage over time. The interior perimeter of the frame, the sides, and the top should be caulked to create an airtight, weather-resistant seal, but the bottom exterior must remain clear for drainage.
How Long After Window Installation Can You Caulk?
Caulking is typically done on the same day as window installation, right after the window is set and secured in the opening. The installation crew applies caulk as part of the finishing process before they move to the next window. If any touch-up caulking is needed in the days after installation, most caulk manufacturers recommend waiting at least one week after the initial application has fully cured before applying additional sealant over it. Inspect caulk lines about a week after installation to make sure they have settled properly, especially around corners and trim joints.
What Are the Most Common Window Design Mistakes Homeowners Make?
The most common window design mistakes are choosing the wrong frame material for Oregon’s climate, picking a window style that does not match the home’s architecture, and selecting glass with the wrong SHGC rating for the window’s orientation. In the Newberg and Portland area, soft-coat Low-E glass with a U-factor of 0.30 or below is appropriate for most applications, and an SHGC between 0.30 and 0.60 is recommended for windows that face south or west to balance winter solar gain with summer heat control. Aluminum frames, while inexpensive, are a poor energy performance choice in Oregon’s climate. Vinyl and fiberglass frames both outperform aluminum for insulation in the Pacific Northwest.
Can Window Installation Be Done in Winter in the Portland Area?
Yes, window installation can be done in winter in the Portland and Newberg area. Oregon winters are cool and wet but rarely extreme enough to prevent professional installation. Experienced crews work year-round in the Pacific Northwest and know how to protect the opening and manage the brief exposure period during window removal and replacement. Caulk and foam insulation should be applied in dry conditions when possible, and a quality installer will plan around rain to ensure a complete, proper seal. If a true storm or freezing temperatures are forecast, most installers will reschedule to protect both the product and the quality of the installation.
Final Thoughts
Window installation day does not have to be stressful. When you take a few hours in the days before the crew arrives to clear the work areas, remove your window treatments, disable your alarms, trim the exterior landscaping, and secure your pets, you set everyone up for a smooth, fast, and clean installation. Most whole-home replacements in the Newberg, Portland, Tigard, and Beaverton areas are finished in a single day by a professional crew. Your job is simply to make sure they can get right to work the moment they arrive.
If you are ready to schedule your replacement windows or you still have questions about what to expect on installation day, the team at EnergyGuard Windows & Doors is here to help. With over 40 years of experience serving homeowners across Newberg and the Willamette Valley, they offer free in-home and showroom consultations with no pressure and no obligation.
Call (503) 554-5500 today or visit the replacement windows page to get started. The sooner you schedule, the sooner your home is more comfortable, more efficient, and ready for whatever Oregon’s